How do I setup NFS v4.0 distributed file system
access server under CentOS / RHEL v5.x for sharing files with UNIX and Linux
workstations? How to export a directory with NFSv4? How to mount a directory
with NFSv4?
Network File System (NFS) is a network file system protocol originally
developed by Sun Microsystems. It allows your users or client compute to access
files over a network. Linux and UNIX like operating systems (including
MS-Windows) can mount file system over a network and work as they are mounted
locally. This is perfect for sharing files or centralized home directories.
NFS version 4 provides
the following benefits over NFSv3 or earlier NFS versions:
1.
Performance
improvements
2.
Mandates security and
ACL
3.
NFS v4 by default
works over TCP s
4.
Easy to setup firewall
option
5.
And much more.
Required Packages
You
need to install the following packages:
§ nfs-utils - The nfs-utils package provides a daemon for the kernel
NFS server and related tools, which provides a much higher level of performance
than the traditional Linux NFS server used by most users.
§ portmap - The portmap package should be installed on any machine
which acts as a server for protocols using RPC.
§ nfs4-acl-tools - This package contains commandline and
GUI ACL utilities for the Linux NFSv4 client.
Install NFS Server
Type
the following command (install nfs4-acl-tools and nfs-utils on client systems
too):
# yum install nfs-utils nfs4-acl-tools portmap
Sample outputs:
Loaded
plugins: downloadonly, protectbase, rhnplugin, security, verify
0
packages excluded due to repository protections
Setting
up Install Process
Resolving
Dependencies
-->
Running transaction check
--->
Package nfs-utils.x86_64 1:1.0.9-44.el5 set to be updated
--->
Package nfs4-acl-tools.x86_64 0:0.3.3-1.el5 set to be updated
--->
Package portmap.x86_64 0:4.0-65.2.2.1 set to be updated
-->
Finished Dependency Resolution
Dependencies
Resolved
==============================================================================
Package Arch Version Repository Size
==============================================================================
Installing:
nfs-utils x86_64 1:1.0.9-44.el5 rhel-x86_64-server-5 390 k
nfs4-acl-tools x86_64
0.3.3-1.el5
rhel-x86_64-server-5 44 k
portmap x86_64 4.0-65.2.2.1 rhel-x86_64-server-5 38 k
Transaction
Summary
==============================================================================
Install 3 Package(s)
Upgrade 0 Package(s)
Total
download size: 472 k
Is
this ok [y/N]: y
Downloading
Packages:
(1/3):
portmap-4.0-65.2.2.1.x86_64.rpm | 38 kB
00:00
(2/3):
nfs4-acl-tools-0.3.3-1.el5.x86_64.rpm |
44 kB 00:00
(3/3):
nfs-utils-1.0.9-44.el5.x86_64.rpm | 390 kB 00:00
------------------------------------------------------------------------------
Total 1.2
MB/s | 472 kB 00:00
Running
rpm_check_debug
Running
Transaction Test
Finished
Transaction Test
Transaction
Test Succeeded
Running
Transaction
Installing
: portmap
1/3
Installing
: nfs4-acl-tools 2/3
Installing
: nfs-utils
3/3
Installed:
nfs-utils.x86_64 1:1.0.9-44.el5 nfs4-acl-tools.x86_64 0:0.3.3-1.el5
portmap.x86_64 0:4.0-65.2.2.1
Complete!
Share File System
/etc/exports This is
main NFS server config file which controls what directories the NFS server
exports (shared with client). It use the following format:
/directory1
server.example.com(options)
/directory2
192.168.1.0/24(options)
/directory3
192.168.1.5(options) 192.168.1.15(options) pc202.nixcraft.net.in(options)
You
can share /sales file system as follows. Edit /etc/exports, enter:
# vi /etc/exports
Add configuration as follows:
/sales
192.168.1.15(rw,sync,fsid=0) 192.168.1.16(rw,sync,fsid=0)
Where,
/sales - Share this directory.
1.
192.1681.15 and 192.168.1.16 - Users from
192.168.1.15 and 192.168.1.16 are allowed to mount /sales with the read-write
permissions.
2.
rw -
Read write option.
3.
fsid=0 - Export a directory over NFS v4. NFSv4 has a concept of a
root of the overall exported filesystem. The export point exported with fsid=0
will be used as this root. The /sales directory will be root for clients. For
example, if you got /sales/mumbai, /sales/pune subdir, then client would see
them as /mumbai and /pune directory. Please note that this can only export one
directory with the fsid=0 option.
Save
and close the file. Turn on services:
# chkconfig nfs on
# chkconfig portmap on
Start both portmap and nfs services, enter:
# service portmap start <-- for NFSv3 support
# service nfs start
Sample outputs:
Starting
NFS services:
[ OK ]
Starting
NFS quotas: [ OK ]
Starting
NFS daemon: [ OK ]
Starting
NFS mountd: [ OK ]
Please note that
portmap service is not required for NFSv4.
Optional: NFS Server
Configuration GUI Tool
Type the following
command to use GUI tool:
# system-config-nfs
Sample outputs:
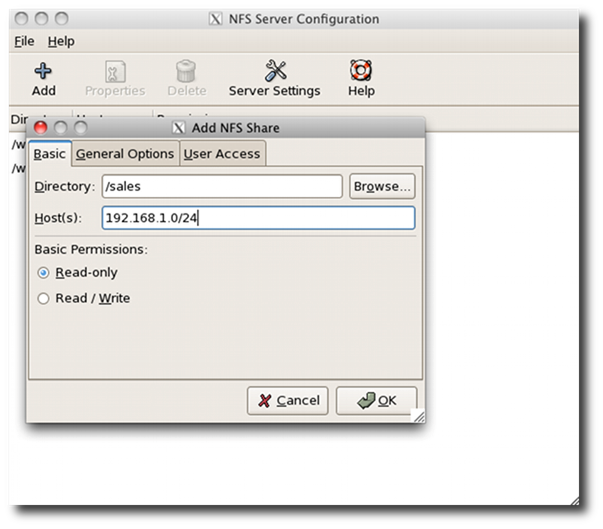 |
Fig.01: Linux NFS
Server Configuration
|
NFSv4 Firewall Configuration
Edit
/etc/sysconfig/iptables, enter:
# vi /etc/sysconfig/iptables
Open TCP port # 2049 which is used by NFSv4. Add the following lines, ensuring
that they appear before the final LOG and DROP lines for the
RH-Firewall-1-INPUT chain:
-A
RH-Firewall-1-INPUT -s 192.168.1.0/24 -m state --state NEW -p tcp --dport 2049
-j ACCEPT
Save and close the
file. Restart RHEL/CentOS firewall:
# service iptables restart
TCP Wrapper
Configuration
TCP Wrapper is a
host-based networking ACL
system, used to filter network access to Internet. Edit /etc/hosts.deny, enter:
Add the following
lines (useful for both NFSv4 and NFSv3):
portmap:ALL
Finally, edit /etc/hosts.allow and add your subnet:
portmap:192.168.1.0/24
Save and close the file.
NFS Client Configuration
The clients can then
mount the NFSv4 export using the following command:
#
mkdir /sales
# mount -t nfs4 servername:/ /sales/
# df -H
# su - username
$ cd /sales/mumbai
$ ls
$ >testfile
$ ls testfile && rm testfile
A Note about User
Management
Use
NIS or OpenLDAP for user management for large number of users. If you've small
number of NFS clients add them to your systems using the useradd command. Make
sure UID and GID matches correctly. For example, if user vivek (UID=500) is
part of group vivek (gid=500) and sales group (Gid=502) on NFSv4 server, than
use the following command to add user toNFSv4 client:
#
grep -q '^sales' /etc/group || /usr/sbin/groupadd -g 502 sales
# /usr/sbin/useradd -s /bin/bash -d /sales -M -u 500 -g 500 -G 502 sales
# su - sales
$ pwd
$ ls && cd mumbai && >testfile && ls -l testfile
&& rm testfile
The above command
matches client and server UIDs and GIDs. Otherwise you will get permission
denied message on NFSv4 clients. As I said earlier, for a large number of NFSv4
users/clients, use centralized authentication systems such as NIS or OpenLDAP.
Mounting NFS File
Systems Using /etc/fstab
Edit /etc/fstab,
enter:
# vi /etc/fstab
Append the entry, enter:
server:/ /sales
nfs4 soft,intr,rsize=8192,wsize=8192,nosuid
Save and close the
file. Make sure netfs service is turned on:
# chkconfig netfs on
How Do I See NFS
Statistics?
To displays statistics
kept about NFS client and server activity, enter:
# nfsstat
Sample outputs:
Server
rpc stats:
calls badcalls
badauth badclnt xdrcall
28131 0
0 0 0
Server
nfs v3:
null getattr setattr lookup access readlink
10 0% 12302 58% 62 0% 166 0% 2122 10% 35 0%
read write create mkdir symlink mknod
7 0% 4039 19% 52 0% 3 0% 0 0% 0 0%
remove rmdir rename link readdir readdirplus
47 0% 2 0% 6 0% 0 0% 1 0% 2273 10%
fsstat fsinfo pathconf commit
21 0% 13 0% 0 0% 4 0%
Server
nfs v4:
null compound
8 0% 6726 99%
Server
nfs v4 operations:
op0-unused op1-unused
op2-future access close commit
0 0% 0 0% 0 0% 54 0% 2019 7% 0 0%
create delegpurge delegreturn
getattr getfh link
0 0% 0 0% 1 0% 8563 30% 2094 7% 0 0%
lock lockt locku lookup lookup_root nverify
0 0% 0 0% 0 0% 78 0% 0 0% 0 0%
open openattr open_conf open_dgrd
putfh putpubfh
2022 7% 0 0% 14 0% 0 0% 6710 24% 0 0%
putrootfh read
readdir readlink remove rename
12 0% 70 0% 16 0% 7 0% 5 0% 3 0%
renew restorefh
savefh secinfo setattr setcltid
1 0% 2022 7% 2025 7% 0 0% 4 0% 5 0%
setcltidconf
verify write rellockowner
5 0% 0 0% 2003 7% 0 0%
How Do I Display
Information About Shared Directories?
To
see mount information for an NFS server (rpc portmap service is required),
enter:
# showmount -e
# showmount -d
# showmount -a server.ip
A Note About NFSv4
Services
1.
The NFSv4 server works without the portmap, rpc.lockd, and
rpc.statd daemons. The rpc.mountd daemon is still required on the server.
2.
The NFSv4 client works without rpc.lockd and rpc.statd.
3.
However, if you are going to mix NFSv4 and NFSv3 than make sure
you start above services on both client and server.
Recommend readings:
For more information
on use of the nfs server, client and additional options, please refer to the
following man pages:
man nfs
man 5 exports
man 8 mount
man 8 umount
man 8 nfsstat
man showmount


