


INTRO: LDAP stands for Lightweight Directory Access Protocol. It is used as
centralized data (or
Directory)
server (not database server)
for various purposes.
There
is a difference between Directory server
and a Database server.
In
Directory server
the data is read more frequently than it is
written.
In
Database server
the data is written more frequently than it is
read.
Here
we shall see how LDAP is
used for creating centralized users (Network
users).
The
Network Users can also be configured using NIS
SUPPORTIVE SERVICES:
Configuration
of NFS is
required at server and
client end.
NFS plays
the backbone for LDAP as it provides the Directory
throughout the network.
Without
NFS configuration
of LDAP does
not work.
PACKAGES NEEDED:
Following packages are required to configure a BASIC LDAP setup.

Approximately
13 packages are required. Better way to install all these packages is to
configure YUM and then install.
Server Packages: Out of 13
packages following packages are required for configuring LDAP server.
openldap
Openldap-clients
openldap-devel
nss_ldap
openldap-servers
Client Packages: Out of 13
packages following packages are needed for configuring LDAP client.
Openldap
Openldap-clients
openldap-devel
nss_ldap
CONFIGURATION FILES:

There are 3 main configuration files:
1] /etc/openldap/ldap.conf
2] /etc/openldap/slapd.conf
3] /usr/share/openldap/migration/migrate_common.ph
as shown in the above picture.
STEP-1—CONFIGURATION OF “ldap.conf”file:
Type the following command to start configuring the “/etc/openldap/ldap.conf”file.
[root@rhel5two ~]# vim /etc/openldap/ldap.conf
Before making the changes the
file looks as shown in the below picture:

After making the changes the
file looks as shown in the picture below:

HOST ---
It is used to identify which is the LDAP server. The IP address
is of that machine which is going to be configured as Directory server ( LDAP server ).
The IP address of the machine in which the LDAP server is going to
be configured is 192.168.5.11.
BASE ---
Used for declaring LDAP domain. The LDAP domain can be of any name. It is not
necessary that it has to be DNS domain.
Here the LDAP domain is “example.org”, where “example” and “org” are the
“domain components” ( dc ).
STEP-2—CONFIGURATION OF “ slapd.conf ” file :
Type the following command to start configuring “/etc/openldap/slapd.conf” file:
[root@rhel5two ~]# vim /etc/openldap/slapd.conf
Before making the changes the file looks as shown in the picture
below:
Lines to be configured – 86,87,91,97.

After making the necessary changes the file
looks as show in the picture below:

cn --- Stands for “common name”. We can give any name /
string to this cn. In this example, the
string
server
is chosen. We
can given any string like abc123, but it is recommended to give that string, which makes sense.
Since this is going to be a LDAP server ( Directory server )the string server is chosen. We can also keep ldapserver as cn. It is your choice.
LDAP home directory: As we have “/var/www/html/”, which is home directory for apache ( Web server ), similarly the home directory for LDAP is “/var/lib/ldap”. We add one more directory
inside “/var/lib/ldap” called “example”, to make LDAP administration easier. The directory
name can be anything,
need not be “example”. The names are not part of the configuration.
STEP-3—CONFIGURATION OF “ migrate_common.ph ” file :
Type the following command to
start configuring
“/usr/share/openldap/migration/migrate_common.ph” file:
[root@rhel5two ~]# vim
/usr/share/openldap/migration/migrate_common.ph
Before configuring the file
looks as shown in the picture below:
Lines to configure – 71, 74
After making
the necessary changes the file looks as shown in the picture below:

STEP-4:
Follow the steps given in the picture
below.
LDIF
--- Stands for LDAP Data Interchange
Format.

STEP-5—CREATE
LDAP USERS & HOME DIRECTORY FOR LDAP USERS:

Password
for “ldapuser” is upto your choice.

Now start the service of NFS
and LDAP. The result is show in the
picture below.

STEP-7—CREATE
LDIF DATABASE FILES:

After executing the above
steps, execute the following command:
[root@rhel5two ~]# cd
/usr/share/openldap/migration

STEP-8—ADD
THE USERS IN THE LDIF DIRECTORY:
Execute the
following LDAP
command to add the users
in the LDIF
files.

After
creating the database for the ldapusers, restart the “ldap” service as shown below:

STEP-9—LDAP
CLIENT SIDE CONFIGURATION:
The following
packages must be present in the client system.

Auto-mount the “/ldaphome”
on the client machine

The
new file “autoldaphome”
has to be created in “/etc”.
It does not exist.
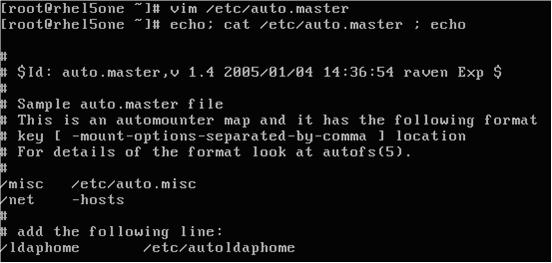
After
creating the above mentioned file, the following entry has to be entered in the
“/etc/auto.master”
file (shown in the picture below).
/ldaphome /etc/autoldaphome
In the below
picture “/ldaphome” will not be listed.

After
restarting the “autofs” service, “/ldaphome” will be listed as shown in the
picture below:

To make client identify the “LDAP server”, execute
the “authconfig-tui” command
[root@rhel5two ~]# authconfig-tui

You will get the configuration table as shown in the above picture.

After pressing the “Next”
button the following screen appears:

Make the changes as shown in the picture
below:
And press “OK” button.

Server IP address =
192.168.5.11
Client IP address =
192.168.5.10
Client
side of LDAP is
configured.

As
you can see when you “grep” for “ldapuser”in“/etc/passwd file no lines come up.
Even “tail”
command does not show that there are users called “ldapuser1” or “ldapuser2” in the
client system.
Both
of the “ldapusers”
are present in the “LDAP server”
and not in the client system.

Now from the above picture, you can see that “ldapusers” exist.
From where did the above entry appear ?
When you do “getent” on the “passwd” database for the “ldapuser2”, it looks
into the file
“/etc/nsswitch.conf” for the following lines.
Execute the following command to see those lines as shown in the
picture below:
[root@rhel5two ~]# vim /etc/nsswitch.conf

In
the above picture “passwd”,
“shadow”,
and “group”
are the databases, and “files”,
and “ldap”
are the sources from where these databases can be accessed.
Therefore
in the “getent”
command, it looks for “ldapuser2”
in the “files”
( local /etc/passwd )
first, if it is not present in that source, it looks for the next source “ldap”, from where it fetches
the information.
Now login
in the client system as “ldapuser2”. This is
shown in the picture below:

This
is just a basic configuration. There are commands delete, modify, and search ldapusers.
Go
through this document. It should provide some insight to LDAP and then it will be
easier for you to understand further documents on the same.
Hope
the information in this documentation helps you. If there are any mistakes
kindly let me know. Will be helpful for me to do the corrections in future.


0 comments:
Post a Comment