Linux Microsoft VMware

Wednesday, August 29, 2012

CentOS / Redhat: Setup NFS v4.0 File Server (Advanced)


How do I setup NFS v4.0 distributed file system access server under CentOS / RHEL v5.x for sharing files with UNIX and Linux workstations? How to export a directory with NFSv4? How to mount a directory with NFSv4?

Network File System (NFS) is a network file system protocol originally developed by Sun Microsystems. It allows your users or client compute to access files over a network. Linux and UNIX like operating systems (including MS-Windows) can mount file system over a network and work as they are mounted locally. This is perfect for sharing files or centralized home directories.

NFS version 4 provides the following benefits over NFSv3 or earlier NFS versions:
1.            Performance improvements
2.            Mandates security and ACL
3.            NFS v4 by default works over TCP s
4.            Easy to setup firewall option
5.             And much more.


Required Packages

You need to install the following packages:
§  nfs-utils - The nfs-utils package provides a daemon for the kernel NFS server and related tools, which provides a much higher level of performance than the traditional Linux NFS server used by most users.
§  portmap - The portmap package should be installed on any machine which acts as a server for protocols using RPC.
§  nfs4-acl-tools - This package contains commandline and GUI ACL utilities for the Linux NFSv4 client.

Install NFS Server

Type the following command (install nfs4-acl-tools and nfs-utils on client systems too):
# yum install nfs-utils nfs4-acl-tools portmap

Sample outputs
:

Loaded plugins: downloadonly, protectbase, rhnplugin, security, verify
0 packages excluded due to repository protections
Setting up Install Process
Resolving Dependencies
--> Running transaction check
---> Package nfs-utils.x86_64 1:1.0.9-44.el5 set to be updated
---> Package nfs4-acl-tools.x86_64 0:0.3.3-1.el5 set to be updated
---> Package portmap.x86_64 0:4.0-65.2.2.1 set to be updated
--> Finished Dependency Resolution
Dependencies Resolved
==============================================================================
 Package           Arch      Version              Repository               Size
==============================================================================
Installing:
 nfs-utils         x86_64    1:1.0.9-44.el5       rhel-x86_64-server-5    390 k
 nfs4-acl-tools    x86_64    0.3.3-1.el5          rhel-x86_64-server-5     44 k
 portmap           x86_64    4.0-65.2.2.1         rhel-x86_64-server-5     38 k
Transaction Summary
==============================================================================
Install       3 Package(s)
Upgrade       0 Package(s)
Total download size: 472 k
Is this ok [y/N]: y
Downloading Packages:
(1/3): portmap-4.0-65.2.2.1.x86_64.rpm                   |  38 kB     00:00
(2/3): nfs4-acl-tools-0.3.3-1.el5.x86_64.rpm             |  44 kB     00:00
(3/3): nfs-utils-1.0.9-44.el5.x86_64.rpm                 | 390 kB     00:00
------------------------------------------------------------------------------
Total                                           1.2 MB/s | 472 kB     00:00
Running rpm_check_debug
Running Transaction Test
Finished Transaction Test
Transaction Test Succeeded
Running Transaction
  Installing     : portmap                                                  1/3
  Installing     : nfs4-acl-tools                                           2/3
  Installing     : nfs-utils                                                3/3
Installed:
  nfs-utils.x86_64 1:1.0.9-44.el5      nfs4-acl-tools.x86_64 0:0.3.3-1.el5
  portmap.x86_64 0:4.0-65.2.2.1
Complete!

Share File System

/etc/exports This is main NFS server config file which controls what directories the NFS server exports (shared with client). It use the following format:
/directory1 server.example.com(options)
/directory2 192.168.1.0/24(options)
/directory3 192.168.1.5(options) 192.168.1.15(options) pc202.nixcraft.net.in(options)

You can share /sales file system as follows. Edit /etc/exports, enter:

# vi /etc/exports


Add configuration as follows:

/sales                       192.168.1.15(rw,sync,fsid=0) 192.168.1.16(rw,sync,fsid=0)

Where,
/sales - Share this directory.
1.    192.1681.15 and 192.168.1.16 - Users from 192.168.1.15 and 192.168.1.16 are allowed to mount /sales with the read-write permissions.
2.    rw - Read write option.
3.    fsid=0 - Export a directory over NFS v4. NFSv4 has a concept of a root of the overall exported filesystem. The export point exported with fsid=0 will be used as this root. The /sales directory will be root for clients. For example, if you got /sales/mumbai, /sales/pune subdir, then client would see them as /mumbai and /pune directory. Please note that this can only export one directory with the fsid=0 option.

Save and close the file. Turn on services:

# chkconfig nfs on
# chkconfig portmap on

Start both portmap and nfs services, enter:

# service portmap start <-- for NFSv3 support
# service nfs start

Sample outputs:

Starting NFS services:                                     [  OK  ]
Starting NFS quotas:                                       [  OK  ]
Starting NFS daemon:                                       [  OK  ]
Starting NFS mountd:                                       [  OK  ]

Please note that portmap service is not required for NFSv4.
Optional: NFS Server Configuration GUI Tool
Type the following command to use GUI tool:

# system-config-nfs

Sample outputs:
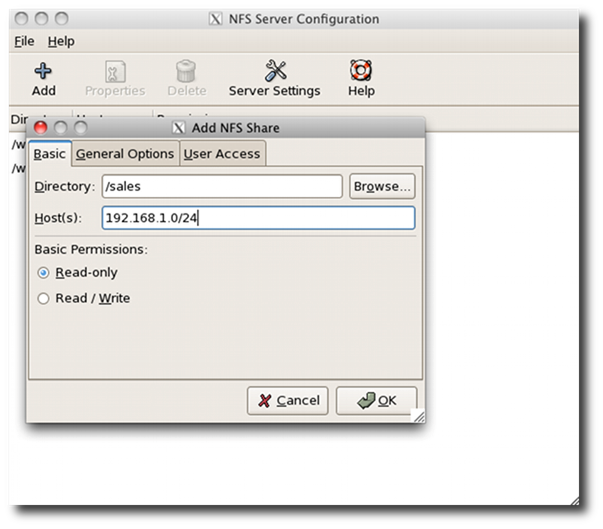
Fig.01: Linux NFS Server Configuration

NFSv4 Firewall Configuration
Edit /etc/sysconfig/iptables, enter:

# vi /etc/sysconfig/iptables

Open TCP port # 2049 which is used by NFSv4. Add the following lines, ensuring that they appear before the final LOG and DROP lines for the RH-Firewall-1-INPUT chain:

-A RH-Firewall-1-INPUT -s 192.168.1.0/24 -m state --state NEW -p tcp --dport 2049 -j ACCEPT

Save and close the file. Restart RHEL/CentOS firewall:

# service iptables restart

TCP Wrapper Configuration

TCP Wrapper is a host-based networking ACL system, used to filter network access to Internet. Edit /etc/hosts.deny, enter:

# vi /etc/hosts.deny

Add the following lines (useful for both NFSv4 and NFSv3):
portmap:ALL
Finally, edit /etc/hosts.allow and add your subnet:
portmap:192.168.1.0/24
Save and close the file.

NFS Client Configuration

The clients can then mount the NFSv4 export using the following command:

# mkdir /sales
# mount -t nfs4 servername:/ /sales/
# df -H
# su - username
$ cd /sales/mumbai
$ ls
$ >testfile
$ ls testfile && rm testfile
A Note about User Management
Use NIS or OpenLDAP for user management for large number of users. If you've small number of NFS clients add them to your systems using the useradd command. Make sure UID and GID matches correctly. For example, if user vivek (UID=500) is part of group vivek (gid=500) and sales group (Gid=502) on NFSv4 server, than use the following command to add user toNFSv4 client:

# grep -q '^sales' /etc/group || /usr/sbin/groupadd -g 502 sales
# /usr/sbin/useradd -s /bin/bash -d /sales -M -u 500 -g 500 -G 502 sales
# su - sales
$ pwd
$ ls && cd mumbai && >testfile && ls -l testfile && rm testfile

The above command matches client and server UIDs and GIDs. Otherwise you will get permission denied message on NFSv4 clients. As I said earlier, for a large number of NFSv4 users/clients, use centralized authentication systems such as NIS or OpenLDAP.
Mounting NFS File Systems Using /etc/fstab
Edit /etc/fstab, enter:

# vi /etc/fstab

Append the entry, enter:

server:/    /sales  nfs4   soft,intr,rsize=8192,wsize=8192,nosuid

Save and close the file. Make sure netfs service is turned on:

# chkconfig netfs on
How Do I See NFS Statistics?
To displays statistics kept about NFS client and server activity, enter:

# nfsstat

Sample outputs:

Server rpc stats:
calls      badcalls   badauth    badclnt    xdrcall
28131      0          0          0          0
Server nfs v3:
null         getattr      setattr      lookup       access       readlink
10        0% 12302    58% 62        0% 166       0% 2122     10% 35        0%
read         write        create       mkdir        symlink      mknod
7         0% 4039     19% 52        0% 3         0% 0         0% 0         0%
remove       rmdir        rename       link         readdir      readdirplus
47        0% 2         0% 6         0% 0         0% 1         0% 2273     10%
fsstat       fsinfo       pathconf     commit
21        0% 13        0% 0         0% 4         0%
Server nfs v4:
null         compound
8         0% 6726     99%
Server nfs v4 operations:
op0-unused   op1-unused   op2-future   access       close        commit
0         0% 0         0% 0         0% 54        0% 2019      7% 0         0%
create       delegpurge   delegreturn  getattr      getfh        link
0         0% 0         0% 1         0% 8563     30% 2094      7% 0         0%
lock         lockt        locku        lookup       lookup_root  nverify
0         0% 0         0% 0         0% 78        0% 0         0% 0         0%
open         openattr     open_conf    open_dgrd    putfh        putpubfh
2022      7% 0         0% 14        0% 0         0% 6710     24% 0         0%
putrootfh    read         readdir      readlink     remove       rename
12        0% 70        0% 16        0% 7         0% 5         0% 3         0%
renew        restorefh    savefh       secinfo      setattr      setcltid
1         0% 2022      7% 2025      7% 0         0% 4         0% 5         0%
setcltidconf verify       write        rellockowner
5         0% 0         0% 2003      7% 0         0%
How Do I Display Information About Shared Directories?
To see mount information for an NFS server (rpc portmap service is required), enter:

# showmount -e
# showmount -d
# showmount -a server.ip
A Note About NFSv4 Services
1.    The NFSv4 server works without the portmap, rpc.lockd, and rpc.statd daemons. The rpc.mountd daemon is still required on the server.
2.    The NFSv4 client works without rpc.lockd and rpc.statd.
3.    However, if you are going to mix NFSv4 and NFSv3 than make sure you start above services on both client and server.

Recommend readings:

For more information on use of the nfs server, client and additional options, please refer to the following man pages:

man nfs
man 5 exports
man 8 mount
man 8 umount
man 8 nfsstat
man showmount

Upgrading Red Hat Enterprise Linux From Version 6.2 to 6.3


Red Hat Enterprise Linux v6.3 has been released and available via RHN for immediate update. How do I upgrade my RHEL from 6.2 to the latest 6.3 version?

You can only upgrade from minor release as Red Hat does not support in-place upgrades between any major versions of Red Hat Enterprise Linux. However, a minor upgrade can be done easily and recommended for all users.

Back up any important data on the server

Make a backup - it cannot be stressed enough how important it is to make a backup of your system before you do this. Most of the actions listed in this post are written with the assumption that they will be executed by the root user running the bash or any other modern shell. Type the following commands to see current version:

# uname -mrs

# cat /etc/redhat-release

RHEL: Upgrading your current system

Type the following yum command:

# yum update -y

Reboot the Linux server:

reboot

OR

shutdown -r now

Verify that everything is working fine:

# uname -a

# cat /etc/redhat_release

# netstat -tulpn

# tail -f /var/log/messages

# tail -f /path/to/log/file

# ps aux | less

# ps aux | egrep 'httpd|mysql'

CentOS / RHEL: Disable or Enable SELinux Policy Modules


H
ow do I disable or enable SELinux policy modules under Red Hat Enterprise Linux running on Dell hardware?

You need to use the semodule command. This command is used to manage SELinux policy modules, including installing, upgrading, listing, disabling and removing modules.

Task: See currently installed modules

Type the following command as the root user:

semodule –l
semodule -l | more
semodule | less

Sample outputs:

abrt    1.2.0
accountsd       1.0.0
ada     1.4.0
afs     1.5.3
aiccu   1.0.0
aide    1.5.0
aisexec 1.0.0
amanda  1.12.0
amavis  1.10.3
amtu    1.2.0
apache  2.1.2
apcupsd 1.6.1
arpwatch        1.8.1
asterisk        1.7.1
audioentropy    1.6.0
automount       1.12.1
avahi   1.11.2
awstats 1.2.0
bind    1.10.2
bitlbee 1.2.1
bluetooth       3.2.2
....
..
..
 Output truncated
....
..
uuidd   1.0.0
varnishd        1.1.0
vdagent 1.0.0
vhostmd 1.0.0
virt    1.4.0
vmware  2.2.0
vpn     1.12.0
w3c     1.0.0
wdmd    1.0.0
webadm  1.1.0
webalizer       1.10.0
wine    1.6.1
xen     1.9.2
xfs     1.6.0
xguest  1.0.1
zabbix  1.2.0
zarafa  1.0.0
zebra   1.10.1
zosremote       1.1.0

Task: SELinux disable module

To disable existing module, type:

 semodule -d MODULE_NAME_HERE

OR

 semodule --disable=MODULE_NAME_HERE

To disable module called webalizer, enter:

# semodule -v -d webalizer

To verify new settings, enter:

# semodule -l | grep webalizer

Sample outputs:

[root@rhel6 ~]# semodule -v -d webalizer
Attempting to disable module 'webalizer':
Ok: return value of 0.
Committing changes:
Ok: transaction number 0.
[root@rhel6 ~]# semodule -l | grep webalizer
webalizer       1.10.0  Disabled

Task: SELinux enable module

To enable existing module, type:

 semodule -e MODULE_NAME_HERE 

OR

# semodule --enable=MODULE_NAME_HERE

To enable module called webalizer, enter:

# semodule -v -e webalizer

Sample outputs:

Attempting to enable module 'webalizer':
Ok: return value of 0.
Committing changes:
Ok: transaction number 0.

yum command: Update / Install Packages Under Redhat Enterprise / CentOS Linux Version 5.x


H
ow do I use yum command to update and patch my Red hat Enterprise Linux / CentOS Linux version 5.x server via RHN / Internet? Can I use up2date command under RHEL 5?

Up2date command was part of RHEL v4.x or older version. You need to use yum command to update and patch the system using RHN or Internet. Use yum command to install critical and non-critical security updates as well as binary packages. Login as the root user to install and update the system.

Task: Register my system with RHN

To register your system with RHN type the following command and just follow on screen instructions (CentOS user skip to next step):

[root@system1 ~]# rhn_register       

Task: Display list of updated software (security fix)

Type the following command at shell prompt:

# yum list updates

Task: Patch up system by applying all updates

To download and install all updates type the following command:

# yum update

Task: List all installed packages

List all installed packages, enter:

# rpm -qa

# yum list installed

Find out if httpd package installed or not, enter:

# rpm -qa | grep httpd*

# yum list installed httpd

Task: Check for and update specified packages

# yum update {package-name-1}

To check for and update httpd package, enter:

# yum update httpd

Task: Search for packages by name

Search httpd and all matching perl packages, enter:

# yum list {package-name}

# yum list {regex}

# yum list httpd

# yum list perl*

Sample output:

Loading "installonlyn" plugin
Loading "security" plugin
Setting up repositories
Reading repository metadata in from local files
Installed Packages
perl.i386                                4:5.8.8-10.el5_0.2     installed
perl-Archive-Tar.noarch                  1.30-1.fc6             installed
perl-BSD-Resource.i386                   1.28-1.fc6.1           installed
perl-Compress-Zlib.i386                  1.42-1.fc6             installed
perl-DBD-MySQL.i386                      3.0007-1.fc6           installed
perl-DBI.i386                            1.52-1.fc6             installed
perl-Digest-HMAC.noarch                  1.01-15                installed
perl-Digest-SHA1.i386                    2.11-1.2.1             installed
perl-HTML-Parser.i386                    3.55-1.fc6             installed
.....
.......
..
perl-libxml-perl.noarch                  0.08-1.2.1             base
perl-suidperl.i386                       4:5.8.8-10.el5_0.2     updates 

Task: Install the specified packages [ RPM(s) ]

Install package called httpd:

# yum install {package-name-1} {package-name-2}

# yum install httpd

Task: Remove / Uninstall the specified packages [ RPM(s) ]

Remove package called httpd, enter:

# yum remove {package-name-1} {package-name-2}

# yum remove httpd

Task: Display the list of available packages

# yum list all

Task: Display list of group software

Type the following command:

# yum grouplist

Output:

Installed Groups:
   Engineering and Scientific
   MySQL Database
   Editors
   System Tools
   Text-based Internet
   Legacy Network Server
   DNS Name Server
   Dialup Networking Support
   FTP Server
   Network Servers
   Legacy Software Development
   Legacy Software Support
   Development Libraries
   Graphics
   Web Server
   Ruby
   Printing Support
   Mail Server
   Server Configuration Tools
   PostgreSQL Database
Available Groups:
   Office/Productivity
   Administration Tools
   Beagle
   Development Tools
   GNOME Software Development
   X Software Development
   Virtualization
   GNOME Desktop Environment
   Authoring and Publishing
   Mono
   Games and Entertainment
   XFCE-4.4
   Tomboy
   Java
   Java Development
   Emacs
   X Window System
   Windows File Server
   KDE Software Development
   KDE (K Desktop Environment)
   Horde
   Sound and Video
   FreeNX and NX
   News Server
   Yum Utilities
   Graphical Internet
Done

Task: Install all the default packages by group

Install all 'Development Tools' group packages, enter:

# yum groupinstall "Development Tools"

Task: Update all the default packages by group

Update all 'Development Tools' group packages, enter:

# yum groupupdate "Development Tools"

Task: Remove all packages in a group

Remove all 'Development Tools' group packages, enter:

# yum groupremove "Development Tools"

Task: Install particular architecture package

If you are using 64 bit RHEL version it is possible to install 32 packages:
# yum install {package-name}.{architecture}

# yum install mysql.i386

Task: Display packages not installed via official RHN subscribed repos

Show all packages not available via subscribed channels or repositories i.e show packages installed via other repos:

# yum list extras

Sample output:

Loading "installonlyn" plugin
Loading "security" plugin
Setting up repositories
Reading repository metadata in from local files
Extra Packages
DenyHosts.noarch                         2.6-python2.4          installed
VMwareTools.i386                         6532-44356             installed
john.i386                                1.7.0.2-3.el5.rf       installed
kernel.i686                              2.6.18-8.1.15.el5      installed
kernel-devel.i686                        2.6.18-8.1.15.el5      installed
lighttpd.i386                            1.4.18-1.el5.rf        installed
lighttpd-fastcgi.i386                    1.4.18-1.el5.rf        installed
psad.i386                                2.1-1                  installed
rssh.i386                                2.3.2-1.2.el5.rf       installed

Task: Display what package provides the file

You can easily find out what RPM package provides the file. For example find out what provides the /etc/passwd file:

# yum whatprovides /etc/passwd

Sample output:

Loading "installonlyn" plugin
Loading "security" plugin
Setting up repositories
Reading repository metadata in from local files
setup.noarch                             2.5.58-1.el5           base
Matched from:
/etc/passwd
setup.noarch                             2.5.58-1.el5           installed
Matched from:
/etc/passwd

You can use same command to list packages that satisfy dependencies:

# yum whatprovides {dependency-1} {dependency-2}

Refer yum command man page for more information:

# man yum

Powered by Blogger.